Window Position Restore
Overview
With PCs, it has become easier to build a wider display and multi-display environment, and more and more applications have been launched.There are things that save the window position at the end of the application and restore it at startup, but if you launch the same application multiple times, it is necessary to adjust the window position each time with the Windows snap function etc.
In order to eliminate the annoyance, I created an application that saves the startup information and window position of the application, and can launch it at once and restore the window position.
Feature
- Supports both desktop apps and store apps (UWP apps).
- After launch application, change the set window position and size.
- The xml configuration file that has been used to "Launch" is displayed as a history in the menu. By clicking the file name of the history, it will be immediately executed without displaying the window of this application.
- By executing this application with the xml configuration file that saves the execution information as an argument, you can only execute the application of the xml setting file without displaying the window of this application.
- Even without checking the command argument, you can get the command if you start in administrator mode.
Operating environment
- OS:Windows 10, 11 * .NET FrameWork 4.7.2 later (4.7.2 was released at the same time as 10 April 2018 Update (version 1803) of Windows10.)
Terms of use
Free software. Available for free.Use this software at your own risk. The author is not liable for any damages or disadvantages resulting from use.
Download
WindowPositionRestore.zip(64bit) Version1.3.1.4 *Please use this for Windows 11.WindowPositionRestore32.zip(32bit) Version1.3.1.4
*When the message "Windows protected youru PC" is displayed after starting the exe file, click the "More info" link and then click the "Run anyway" button.
*Since the author doesn't own the Windows 10 32bit environment, the 32bit version has been confirmed to run in the 64bit environment of Windows 10 and 11. If you have any problems, please email me.
About donations
If you like this software, please consider donating with PayPal. The donations received will be used for development costs.I cannot respond to refunds of donations once sent.
In addition, there will be no difference in the addition of functions and support depending on whether or not there is a donation.
Please note.
Usage overview ( Launcher function )
- Unzip the downloaded compressed file and copy it to a suitable folder.
- Run "WindowPositionRestore.exe" as administrator.
*It just shows an icon in the task tray.
*If you do not run as administrator, you cannot get the "CommandLine" of the "List of Windows" for the desktop application.
*If you do not need to acquire "CommandLine", you do not need to run as administrator. - Launch the app you want to launch from the Windows Start menu. (The application can be run even before WindowPositionRestore.exe is started.)
- Right-click the "Window Position Restore" icon on the task tray and click "Show Window" in the displayed menu to display the "Display Window" and "List of Windows".
- Click the "Set" radio button in the "Display Window".
- In the "List of Windows", change the settings of the application you want to launch.
- Set a numerical value in the "Launch order" of the window you want to execute. *If "Launch order" is blank, click it to set the number automatically.
- If an argument is required, add a space after the command in "CommandLine" and set the argument. Example) If you want to display the D drive in Explorer, add " D:\" and make it "C:\WINDOWS\Explorer.EXE D:\".
- Set the window position and size with "x", "y", "width", and "height". *You can also change the window position by dragging the window rectangle in the "Display Windows".
- In the "Display Window", press the "Launch" button. In the "List of Windows" window, instead of "minimize", launch the application that has "Command Line" and "Launch order" specified in the order of "Launch order". After launching the application, if the "width" and "height" are greater than 0, change the position and size of the window.
- Use the "Save" button in the "Display Window" to save the "List of Windows" list. From the next time, you can launch the app by loading the file saved with the "Load" button in the "Display Window" and then pressing the "Launch" button. In addition, if you execute "Launch" after saving once, xml configuration file will be saved as history in the task tray menu. Just click on the file name of the history to launch xml configuration file.
- To exit the application, press "Exit" in the menu.
Usage overview (Window layout restoration function)
In the following cases, it's difficult to rearrange the windows, so I added a function to memorize the window positions of all virtual desktops in memory and restore the positions.- If you use a 4K display and a 2K display as a multi display with the DISPLAY PORT cable, it will switch to the power saving mode, and after returning from it, the layout and size of the displayed window will change.
- When using multi-display on a laptop, remove the sub-display and reattach it
*If you do not start "Window Position Restore" in the administrator mode, the windows stored in the memory will be excluded from the applications started in the administrator mode.
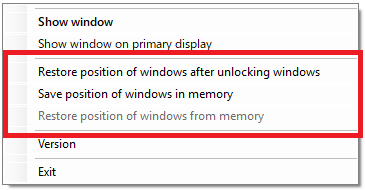
- You can manually save the window position information by clicking "Save position of windows in memory" on the taskbar menu.
- If you check "Restore position of windows after unlocking windows" on the taskbar menu, the window position at the time of locking will be saved (updated if already saved) and unlocked The restoration process starts automatically.
- If the above automatic processing does not work, you can manually restore the window position by clicking "Restore window position from memory" in the taskbar menu. *When a large number of windows are displayed, automatic processing may not work properly. This is because the window information is saved when locked, but the display power saving is activated and the window information is rewritten during saving.
Detail of function ( Launcher function )
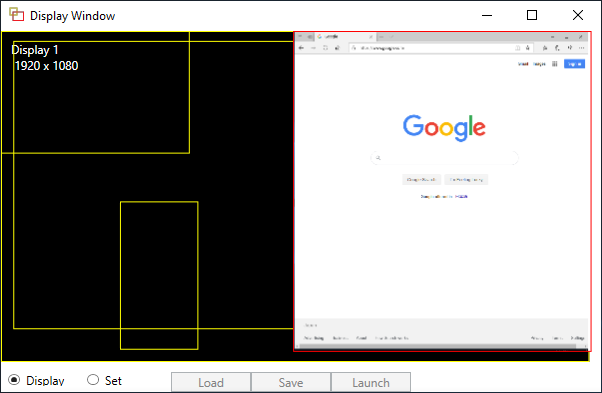
This application mainly consists of "Display Window", "List of Windows".- Display Window
- Display rectangle: The connected display is represented by a rectangle. Information is displayed along with the size in order from Display1.
- Window rectangle: The window is represented by a yellow rectangle. Click the border to make a selection window rectangle. When the "Display" radio button is on, selecting a window brings the selected real window to the front.
- Selected window rectangle: The selected window is represented by a red rectangle. If the "Display" radio button is activated, the image of the current window is displayed within the selected border. The real window is moved by dragging the border.
- "Display" radio button: When it's on, the displayed main window is displayed in real time. The display mode is used to get the command line of the app and determine the window position.
- "Set" radio button: Enters setting mode when on. When it's on, "Load" button, "Save" button, "Launch" button will be available.
- "Load" button: Loads the saved xml configuration file. When the xml configuration file is opened, the window list is reset with the contents of the specified xml configuration file.
- "Save" button: Saves the list of windows as an xml setting file.
- "Launch" button: In the "List of Windows" window, instead of "minimize", launch the application that has "Command Line" and "Launch order" specified in the order of "Launch order". After launching the application, if the "width" and "height" are greater than 0, change the position and size of the window.
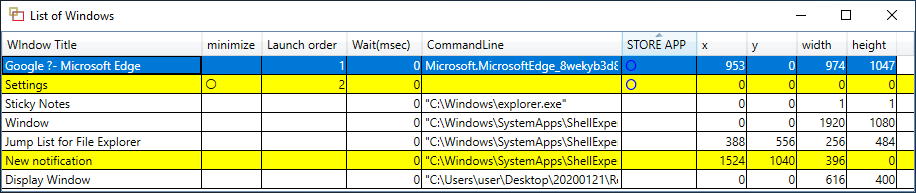
- List of Windows
- Window title: When the "Display" radio button is on, the window title is displayed in real time. If the "Set" radio button is on, you can set any character string. This string has no effect on launching the app.
- minimize: Displays "○" when the window is minimized. When the "Display" radio button is on, clicking "Minimize" minimizes the window display and returns to the window display when it is minimized.
- Launch order: Set the order to execute the application when pressing the "Launch" button. When blank, click to set the number with the maximum number + 1.
- Wait (msec): Sets the pause time in milliseconds after starting the application when the "Set" button is pressed. When launching a app, the startup time of the app may be slow, and the window may not be moved correctly. In such a case, set a numerical value and adjust the delay time for the window movement command.
- Command Line: Displays and sets the execution command. In the case of a desktop application, the application is started with the setting value of the execution command as it is.
- STORE APP: Displays "〇" if the app is a store app. When the "Set" radio button is on, you can turn on and off "〇".
- x: Display and set the x coordinate of the visible upper left corner of the window. The coordinates of the upper left corner of the main display are x = 0, y = 0.
- y: Display and set the y coordinate of the visible upper left corner of the window.
- width: Displays and sets the window width.If 0, the background color of the entire row is yellow.
- height: Displays and sets the window height.If 0, the background color of the entire row is yellow.
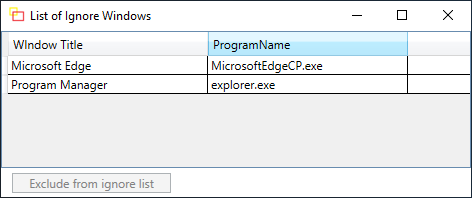
- List of Ignore Windows
- In the "List of Windows" window, select the window you do not want to display.
- Press the right mouse button to display the shortcut menu.
- Click "Add to ignore list". *If you want it to be displayed again, set "Exclude from ignore list" in the "List of Ignore Windows".
The window rectangle can be dragged and moved.
When the "Display" radio button of "Display window" is turned on, the window displayed on the screen not set to "List of Ignore Windows" is displayed in real time.
By right-clicking the mouse, a shortcut menu related to "List of Ignore Windows" described later is displayed.
If the "Set" radio button of "Display window" is on, set the window to be executed.
You can add and delete rows by right-clicking the mouse.
When a numerical value is set, it becomes blank when clicked.
For store apps, set AUMID (AppUserModelID = packagefamilyname + "!" + Application.id).
If a command or argument contains a space, enclose it in "(double quotes).
Example) When opening "C:\Program Files (x86)" with Explorer, use "C:\WINDOWS\Explorer.EXE "C:\Program Files (x86)"".
When the "Launch" button is pressed, the "〇" line is the execution command in the store application execution method.
On the other hand, the line that is not "〇" is the execution method of the desktop application, and the "execution command" is executed.
If multiple displays are connected, the display other than the main display is on the left side of the main display, the x coordinate will be-(minus).
Also, the display other than the main display is above the main display, the y coordinate is marked with-(minus).
*The display number was not relevant.
Precautions for use
- About the windows displayed in the "List of Windows" The "List of Windows" window displays windows that are non-zero in size.Therefore, a hidden window of the system may be displayed. Please be careful not to minimize or launch those windows that cannot be seen in the taskbar.
- Although this application is created to be general purpose, it is not possible to get and start the execution commands of all applications. The reason is that it is difficult to analyze all apps, such as Chrome, which will be described later, because there is a difference in the activation mechanism and window control for each app.
- About starting Chrome When Chrome is started with a URL specified as an argument, if a chrome window already exists, a tab is added and displayed. If you specify " --new-window" with the URL argument, it will be displayed as a new window.
- About starting Edge(UWP version) When Edge is started by specifying URL as an argument, if an Edge window already exists, a tab is added and displayed. Since there is no option like Chrome, if an argument is set and the width and height are greater than 0, an empty Edge window is displayed once and it is moved to the URL of the argument. Therefore, the first page is displayed once.
- About starting Edge(Chromium version) Because the new Edge is based on Chromium, it behaves like Chrome.
The execution command has also been changed to msedge.exe and it is no longer a UWP application. When displaying a window separately, a new window can be displayed by adding "--new-window" to the execution command like chrome. Also, when a new Edge is installed, the previous UWP version Edge is deleted and it seems that it cannot be returned.
With such a specification, a new Edge is installed, the edge of the UWP application is registered in the xml setting file, and if you execute "Launch" of this application, you can not move the URL or adjust the position of the window and an error occurs.
I've done a lot of Edge support, but in the above case, I haven't considered changing the "Command Line" automatically. Therefore, if an error occurs in "Launch", it is necessary to rewrite the "Command Line" to msedge.exe including the path and register the "STORE APP" column off again.
Change log
- Version 1.0.0.0 2019/08/28 First release
- Version 1.1.0.0 2019/09/02
- Added prevention of multiple activation
- Changing the saved items in the xml configuration file
- Added command line launch By creating a shortcut for "WindowPositionRestore.exe" and setting it as "Program location directory \ WindowPositionRestore.exe [xmlConfigurationFile]" as the link destination, the xml configuration file startup process is executed without displaying the window.
- Version 1.1.1.0 2019/09/19 Fixed window image display problems (return from sleep, drawing outside display)
- Version 1.1.2.0 2019/10/18 Window acquisition method change at window startup (excluded when title is empty,
wait processing added until there is only one for multiple windows, Add an error message when the window cannot be identified) - Version 1.1.3.0 2019/12/13 Changing the display mode operation method ( Improvement when window rectangle cannot be dragged,
Improved response when selecting windows.) - Version 1.1.4.0 2019/12/20 Added ignore windows function.
- Version 1.1.5.0 2020/01/23 Change operation of "Execute setting"
- Changed "launch" column of "List of Windows" to "Launch order" column, and changed to execute according to the Launch order.
- When "width" or "height" of "List of Windows" is 0, and "Lauch" is executed, "Ccommand Line" is executed, but window position and size are not adjusted.
- When "Command Line" is Edge and width or height is 0, change to Windows10 execution method and execute it as it is. The execution method of Windows10 is to execute a new Edge window if there is no Edge window, and to add a new tab if there is an Edge window.
- If the “Store” column is “〇”, it is displayed in blue.
- If "width" or "height" is 0, the background color of the row is displayed in yellow.
- Changed to save the column order and column sort information after exiting this application and restore it when starting this application.
- Version 1.1.6.0 2020/02/17 Adjusting the displayed window in display mode.
- In display mode, hibernating windows are not displayed in UWP apps.
- Review the initial ignore list.
- Version 1.1.7.0 2020/03/06 Virtual desktop support
- Changed display mode to target only the currently displayed virtual desktop window.
- Changed to tool window to display "Window Position Restore" screen on all virtual desktops.
- Since the icon is not displayed in the tool window, change to the task tray application.
- Even at high DPI (display settings greater than 100%), the display is 100% the size of the display.
- Version 1.1.7.1 2020/03/13 Bug fixed.
- Solved the problem that the processing of drawing the window rectangle was not performed when the shell was stopped and restarted.
- Solved the problem that window width and height were not restored when starting Window Position Restore on Windows 8.1.
- Version 1.1.8.0 2020/03/18
- In display mode, the display on the screen is updated when the display is turned on or off.
- Version 1.1.8.1 2020/03/24
- Solved the problem that an error message keeps appearing when an error occurs in display mode.
- Version 1.1.8.2 2020/04/16
- Fixed not to recognize the splash window (logo displayed at startup) as a window when launching.
- Version 1.1.8.3 2020/04/24 The following improvements.
- Improved the image quality by changing the display method of the active window image in the display mode.
- Fixed a problem that sometimes hangs when switching virtual desktops.
- Version 1.1.8.4 2020/05/01
- Corrected to wait until URL is set when launching a new window by specifying URL as an argument in Edge.
- Version 1.1.9.0 2020/05/29 Change as task tray application.
- Changed so that the "Display window" and "Lists of window" are not displayed at startup, and that the application is not terminated even if the "Display window" is closed.
- The termination of Window Position Restore is changed only when you click "Exit" in the task tray menu.
- In the task tray menu, it is possible to display the history of up to 10 xml configuration files that have been launched. *Just saving the xml configuration file does not display it as a history.
- The history can be pinned so that up to 10 files can be pinned.
- When you click the xml configuration file that is displayed in history or pinned, the setting is immediately launched.
- Version 1.1.9.1 2020/06/29 Bug fixed.
- Fixed the problem that history is not saved when Windows is shut down.
- Solved the problem that hangs up when returning after sleeping Windows in display mode (setting mode is set when returning).
- Version 1.2.0.0 2020/07/10 Function addition
- Changed to display a progress window so that you can see the execution status when you start this application with the xml configuration file as an argument or perform "Launch" from the task tray history.
- Added the function to save the currently displayed window position in memory and restore that position.(see "Usage overview (Window layout restoration function)".)
- Version 1.2.1.0 2020/07/29 Window layout restoration function change
- Changed to be able to restore the icon state and the maximized state window while maintaining the state.
- Changed to save to the memory separately, automatic save when locked and manual save.
- Fixed a problem that the first time the UWP app is launched may fail.
- Fix the problem that the splash window of Excel 2016 is recognized as the placement target window.
- When "Width" or "Height" of "List of Windows" is 0, the internal process when "Launch" is changed and the startup speed is improved.
- Version 1.2.2.0 2021/03/17 Function addition
- When the application that changes the virtual desktop is started after launching applications, the virtual desktop is restored and the window is also moved.
- When the launch order is specified in the setting mode, the launch order is displayed as a numerical value in the window rectangle.
- If the setting information of the previous version exists, it will be inherited.
- Version 1.2.3.0 2021/05/19 Correspondence below
- In Windows10, the coordinates of the list window and the rectangle of the display window are displayed in the area excluding the invisible frame of the window.
- In window layout restoration function, restoring windows across displays with different DPIs was excluded because they were not moved or resized correctly.
- Fixed an issue where the version information dialog was displayed in the wrong position.
- Version 1.2.3.1 2022/03/14 Bug fixed.
- Fixed a bug that the window position is changed even if the width or height is set to 0 when the setting is executed in Windows10.
- Addressed an issue where the program would terminate abnormally if the virtual desktop was not recognized correctly.
- Version 1.3.0.0 2022/05/02 Supports Windows 11
- Changed the display method of active window images in display mode from Desktop Duplication to Windows Graphics Capture. Since Windows Graphics Capture was introduced from Windows 10 (1803), this application doesn't work on Windows 8.1.
- Supports changes to the virtual desktop API.
- In window layout restoration, window layout other than the displayed virtual desktop is no longer performed. Therefore, I changed the virtual desktop and changed it to restore the window layout.
- Version 1.3.1.0 2022/05/12 Window layout restoration function change
- Added a function to automatically save the window state where the setting was executed and restore it with the menu "Restore the window to the state of the last setting execution" in the task tray.
- Version 1.3.1.1 2022/05/25 Bug fixed.
- When switching the active window in the display mode, Windows Graphics Capture may not respond and may become inoperable for a certain period of time. It is monitored by a sub thread, and if it doesn't respond, the window image is not displayed and it is corrected so that it can be operated.
- Version 1.3.1.2 2022/10/21 Supports Windows 11(22H2)
- Supports changes to the virtual desktop API.
- Version 1.3.1.3 2024/05/31 Supports Windows11(23H2)
- Supports changes to the virtual desktop API.
If you run the 32-bit version on Windows 11 (23H2), the virtual desktop API will not work properly. Please use the 64-bit version. - Since there were times when windows were not displayed properly, I changed Windows Graphics Capture back to Desktop Duplication.
- Version 1.3.1.4 2024/09/13 Correspondence below
- "List of Ignore Windows" can now be edited directly.
- Fixed a bug that could cause a startup error in the 64-bit version.
Feedback
- If you have any feedback, please email do_more51@yahoo.co.jp.
Go back to previous page